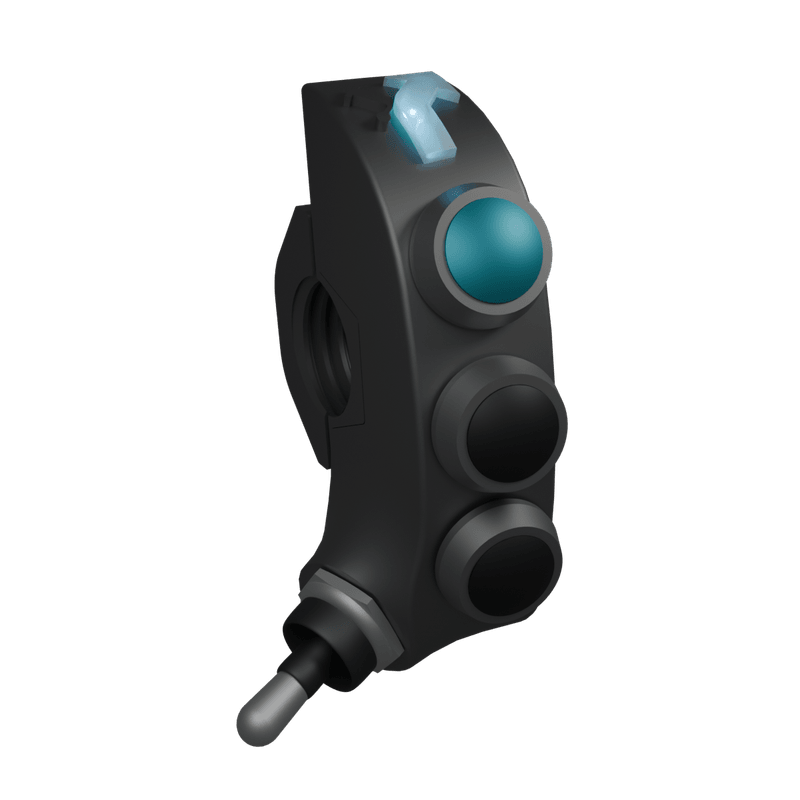
Optimal Position: Install on the left side of your handlebars, positioned just right of the handle for easy thumb operation of the switch lever.
Installation Steps
Position device and clamp
Place your YARR Navigator on the left side of your handlebars for comfortable thumb access. Position the mounting clamp in place.
Secure with allen screws
Insert and tighten the two allen screws through the clamp to secure the device to your handlebars.
Important: Only tighten enough so the device is secure and doesn't rotate. Over-tightening could damage the control's anchoring.
Test the installation
Ensure the device is firmly mounted and positioned for easy operation while riding.
Power Your Device
Your YARR Navigator has no internal battery and operates on continuous power. Choose the option that best fits your setup:
USB Connection (Recommended)
First option: Use your motorcycle's USB port if available
Alternative: Use a power bank when your bike doesn't have USB power
Benefits: Easy installation, low consumption, any USB source works perfectly
Protection: USB connections require weather protection - keep USB plugs covered or in protected areas when riding in wet conditions.
Direct 12V Connection
For permanent installation: Connect directly to your motorcycle's battery
Benefits: Always-active power supply, perfect for fixed installation
Included: Power cable with waterproof M8 connector
⚠️ Important: Ensure correct polarity - red wire to positive (+), black wire to negative (-) terminal. For waterproof operation, properly seal all 12V cable connections with heat shrink tubing or electrical tape.
Automatic Power-On: Your device powers on automatically when connected - no buttons needed!
Connect via Bluetooth
Pairing is simple and only needs to be done once:
Turn on Bluetooth
Enable Bluetooth on your smartphone or device.
Find "YARR PRO V1"
Your device automatically enters pairing mode on first use. Look for "YARR PRO V1" in your Bluetooth settings.
Tap to connect
Select "YARR PRO V1" and you're paired!
Auto-Reconnect: Your device remembers paired connections and automatically reconnects when powered on.
Operation
Understanding Your Device
Your YARR Navigator Pro works as a wireless remote control for your phone or GPS device. When you press its buttons, it sends commands to help you navigate without touching your phone.
What's on Your Device
Your device has:
3 buttons (top, middle, bottom)
1 switch lever that rocks forward and backward
1 colored light that shows you what mode you're in
How to Press the Buttons
There are 4 different ways to press each button, giving you multiple control options:
Single Press
How: Press and release quickly (like clicking a mouse)
Best for: Basic navigation - up, down, left, right, select
Double-Click
How: Press twice quickly (like double-clicking a mouse)
Best for: Back button, cancel, special shortcuts
Long Press
How: Press and hold for about 1 second
Best for: Voice assistant (Siri/Google), switching modes
Double-Long Press
How: Double-click, then keep holding the second press
Best for: Advanced functions (rarely needed)
Continuous Mode
Each press type can be configured with continuous mode to send multiple commands:
Single Press + Continuous Mode: Sends repeated presses while you hold the button down
Double-Click + Continuous Mode: Sends repeated double-clicks while you hold down
Long Press + Continuous Mode: Sends repeated long press commands
⚠️ Important: Only some continuous modes affect other actions:
If Single Press has continuous mode → Long Press doesn't work
If Double-Click has continuous mode → Double-Long Press doesn't work
Long Press and Double-Long Press with continuous mode don't affect other actions
Configure continuous mode in the app according to your specific needs.
Understanding the Colored Light
The colored light tells you which mode your device is in and what's happening:
Mode Colors
Cyan: Simple Mode (easy navigation)
Magenta: Advanced Mode (rally racing)
Green: GPS Mode (map controls)
Blue: Music Mode (play, pause, volume)
Orange: Your Custom Mode 1
Teal: Your Custom Mode 2
Yellow: Emergency Mode (always works)
What the Light Means
Steady light: Everything working normally
Quick flash: Button press registered
Off: Device sleeping or no power
How to Switch Between Normal Modes
To change between your regular modes:
Press and hold the top button (Button 1)
Push the lever forward - with each lever click the LED changes to the next mode
Repeat as needed - continue pressing lever forward while holding the top button until you see the desired mode color
Release the top button - the device will stay in the selected mode
Mode Cycling: Your device cycles through all enabled modes in fixed order (Simple → Advanced → GPS → Music → Custom modes), then returns to the first mode.
Important: If you have configured your device, the LED colors and available modes may be different from the default setup. Modes can be enabled or disabled based on your configuration.
Learn More: See the Device Modes section for details about what each button does in each mode.
Power Your Device
Your YARR Navigator has no internal battery and is designed for continuous power - perfect for motorcycle use:
Instant-on when you connect power - no waiting
Standby mode automatically activates to save power (see Standby Mode section below)
Wake up by pressing any button
Always ready - no charging or battery management needed
Always-On Design: No internal battery means no charging cycles, no battery degradation, and no power anxiety - just reliable operation when connected.
Low Power: Uses very little power, so even a small power bank lasts hours.
For details on connection options (USB, 12V, power bank), see the Getting Started section.
Standby Mode
What is Standby Mode?
Standby mode is a power-saving state where the device reduces functionality to minimize power consumption.
When Does the Device Enter Standby Mode?
Your device automatically enters standby mode:
After 1 hour of inactivity (no button presses or Bluetooth activity)
After 1 minute if Bluetooth fails to pair with a device
What Happens in Standby Mode?
Connections terminated - All Bluetooth connections are disconnected
LED turns off - The status light goes dark to save power
Minimal power consumption - Device uses the least amount of power possible
How to Exit Standby Mode
Simply press any button to wake the device and resume normal operation. The device will automatically begin searching for Bluetooth connections again.
Storage Tip: For maximum power savings during long-term storage, physically disconnect the device from power rather than relying on standby mode.
Compatible Apps
Your YARR Navigator works with most navigation and media apps on your phone:
Navigation Apps: Google Maps, Waze, OsmAnd, Apple Maps, and most GPS navigation apps
Music Apps: Spotify, Apple Music, YouTube Music, and other media players
How it works: Your device sends keyboard commands to your phone, so it works with any app that responds to arrow keys, enter, and media controls.
For app-specific configurations, see the Configuration section.
Update Your Device
What is a Device Update?
Just like your phone gets updates, your YARR Navigator can download new features and improvements. Updates happen through WiFi and make your device work better.
When Should You Update?
Update your device when:
We announce new features on our website or social media
Check our changelog to see what new features are available
Your device isn't working properly and technical support suggests updating
💡 Tip: Visit our changelog page to see the latest firmware updates and new features before updating your device.
How to Update (4 Easy Steps)
Create WiFi Hotspot
Set up a mobile hotspot or WiFi network with these exact settings:
Network Name (SSID):YARR_OTA
Password:YARR12345678
Security: WPA2
Important: The name and password must be exactly as shown above. Your hotspot must have internet access.
Prepare Your Device
Place your device close to your WiFi hotspot (within 30 feet)
Make sure your device is off (unplug power if needed)
Trigger Update Mode
Power on your device while holding Button 1 (the TOP button):
Hold down the top button before powering on
Keep the top button pressed for 3 seconds after power-on
The device will enter update mode
Important: The device must be started with the top button already pressed. This is the only way to enter update mode.
Watch LED Status and Wait
Your device's LED will show you exactly what's happening during the update:
🟡 Orange/Yellow Flashing
Device is in update mode, searching for WiFi hotspot
Looking for WiFi network named "YARR_OTA"
Duration: Until WiFi connection is established
🔵 Cyan Solid
Connected to WiFi, checking for updates
Downloading update information and checking for new firmware
Duration: 30-60 seconds
🔵 Cyan/Blue Slow Flash
Downloading and installing firmware
Update is being downloaded and installed
Duration: 2-5 minutes depending on connection speed
⚠️ CRITICAL: Do NOT power off during this phase
Final Status Results:
🟢 Green Flashing: Update successful!
New firmware installed successfully
Device will reboot automatically with new version
🟡 Yellow Flashing: No update needed
Device already has the latest firmware
Configuration may have been updated
🔴 Red Flashing: Update failed
Check WiFi connection and internet access
Try the update process again
Important Notes
Internet connection required - Your WiFi hotspot must have internet access
Do not power off the device while LED is blue/cyan flashing
Update duration: 2-5 minutes depending on connection speed
Automatic reboot after successful update
Settings preserved - Your configurations remain intact during firmware updates
Update Troubleshooting
If you experience problems during the update process, see the Troubleshooting section for detailed help with update issues.
What Gets Updated?
When you update, your device gets:
New features and improvements
Bug fixes that make it work better
Better compatibility with navigation apps
Your personal settings stay exactly the same
How Often Should You Update?
We don't update automatically - you choose when
Follow us on social media to know when new updates are available
The update process is safe and won't change your personal settings or button customizations.
Device Modes
Available Control Modes
Your YARR Navigator comes with 6 regular modes that you can cycle through, plus 1 separate emergency mode for backup situations. Each mode is specifically designed for different activities and apps, making your navigation experience smooth and intuitive.
Pre-Built Modes (Ready to Use)
These four modes work perfectly right out of the box and are included in the normal mode cycle:
Simple Mode (Cyan) - Basic navigation with arrow keys, map centering, enter/ESC functions, and lever zoom controls
Advanced Mode (Magenta) - Rally roadbook controls with customizable functions
GPS Mode (Green) - Map navigation with center map, zoom in/out on levers, and waypoint control
Music Mode (Blue) - Media control with play/pause, track skip, and volume
Custom Modes (Your Personal Setup)
Two modes you can customize completely for your specific needs, also included in the normal mode cycle:
Custom Mode 1 (Orange) - Create your own button layout
Custom Mode 2 (Teal) - Second custom setup for different scenarios
Custom Configuration Notes
Important: The modes and LED colors described above are the default factory settings. If you have configured your device using the web panel, your setup may be different:
Custom LED colors - You can assign any color to any mode
Default modes - You can only change the LED color and enable/disable them (button functions are not editable)
Custom modes - Can be active and have button functions fully programmed
Interactive Device Explorer
Use the 3D device viewer below to explore each mode. Select a mode from the left panel, then click the device buttons to see what each button does in that mode. You can also drag to rotate the device and explore all button positions.
Device Modes
Default
Simple
Basic navigation control
Default
Advanced
Enhanced control features
Default
Navigation
GPS and roadbook optimized
Default
Music
Media control interface
Button Actions
Select a Button
Click any button on the 3D device to view its default actions
Modes and Button Actions
Default
Simple
Basic navigation control
Default
Advanced
Enhanced control features
Default
Navigation
GPS and roadbook optimized
Default
Music
Media control interface
Select a Button
Click any button on the 3D device to view its default actions
Emergency Mode (REBOUND) is activated differently and is not part of the normal mode cycle:
Emergency Mode (Yellow) - Basic functions that always work if other modes fail or if the lever is damaged
Emergency Mode Activation
Although your device is designed to withstand impacts, in case of lever damage or issues with other modes, emergency mode provides backup functionality:
Activation: Hold all 3 buttons simultaneously for 3 seconds
Emergency Mode Functions
This mode provides essential controls without relying on the lever:
Input
Function
Output
Lever Forward
Advance roadbook
z key
Lever Backward
Reverse roadbook
x key
Button 1
Left arrow
← (Left Arrow)
Button 1 (double)
Right arrow
→ (Right Arrow)
Button 2
Up arrow
↑ (Up Arrow)
Button 3
Down arrow
↓ (Down Arrow)
Ideal for:
Backup when lever is damaged after a crash
Basic navigation in any app
Roadbook controls always available
Reliable functionality in tough situations
Configuration
Customize Your Device
Your YARR Navigator is customizable to match your specific needs. You can create custom modes with fully configurable button functions, change LED colors of all modes, and enable/disable modes according to your needs.
What Can You Customize?
Button Actions (Custom Modes Only)
Single Press - Quick tap actions (navigation, enter, back)
Double Click - Two quick presses for special functions
Long Press - Hold for voice assistant or mode switching
Double-Long Press - Advanced combinations for power users
Note: The default modes (Simple, Advanced, GPS, Music) have fixed button functions that cannot be edited. You can only change their LED color and enable/disable them.
Custom Modes
Create your own modes for specific apps or activities
Configure LED colors to easily identify each mode
Save multiple profiles for different vehicles or use cases
Import/export configurations to share with other YARR users
App-Specific Configurations
Google Maps - Zoom, navigation, voice commands
OsmAnd - Waypoints, track recording, map layers
Spotify - Play/pause, skip tracks, volume control
Custom Apps - Any app that responds to keyboard shortcuts
Click device buttons in the 3D viewer to configure them
Save your settings - they'll sync to your device the next time you update firmware
Pro Tip: For custom modes, start with simple configurations rather than starting with complex functions. The default modes work perfectly without modifications and help you get familiar with the device.
Maintenance
Cleaning & Care
Your YARR Navigator Pro device is waterproof and designed for all-weather riding conditions.
Device is fully waterproof - safe for cleaning with water or damp cloth
M8 power connector is weatherproof - provides sealed power connection
Safe in rain, mud, and harsh weather with proper cable installation
Do not use harsh chemicals or abrasives that could damage the surface
Cable connections need sealing - properly protect USB and 12V connections from weather
Built for outdoor use - designed for motorcycle adventures in all conditions
Power Management
For complete information on power options and connection, see the Getting Started section.
Firmware Updates
For complete information on updating your device, see the Device Update section.
Troubleshooting
Common Issues
Device Won't Turn On
Check power connection - ensure cable is securely connected
Check power source - try different USB port or 12V connection
Try different power cable if available
Check for loose connections at both device and power source
Force restart by unplugging for 10 seconds, then reconnecting
Contact technical support if issue persists
Bluetooth Connection Issues
Ensure Bluetooth is enabled on your device
Clear Bluetooth cache on your phone
Restart both devices
Re-pair the connection
Buttons Not Responding
Check current mode: Switch to a default mode (Simple, Advanced, GPS or Music) to rule out custom configuration issues
Check device response: Press any button and verify the LED flashes briefly. If it doesn't flash, the issue is hardware or power
If LED flashes but buttons don't work:
Restart the device (disconnect and reconnect power)